The difference between an efficient batch print and a wasteful one is mostly geometry, not slicer settings. A Saturn-class plate that fits sixteen Marines is a Saturn-class plate that fits eight if the painter is careless about packing. Worth twenty minutes of slicer time to get the layout right.
Why batching matters
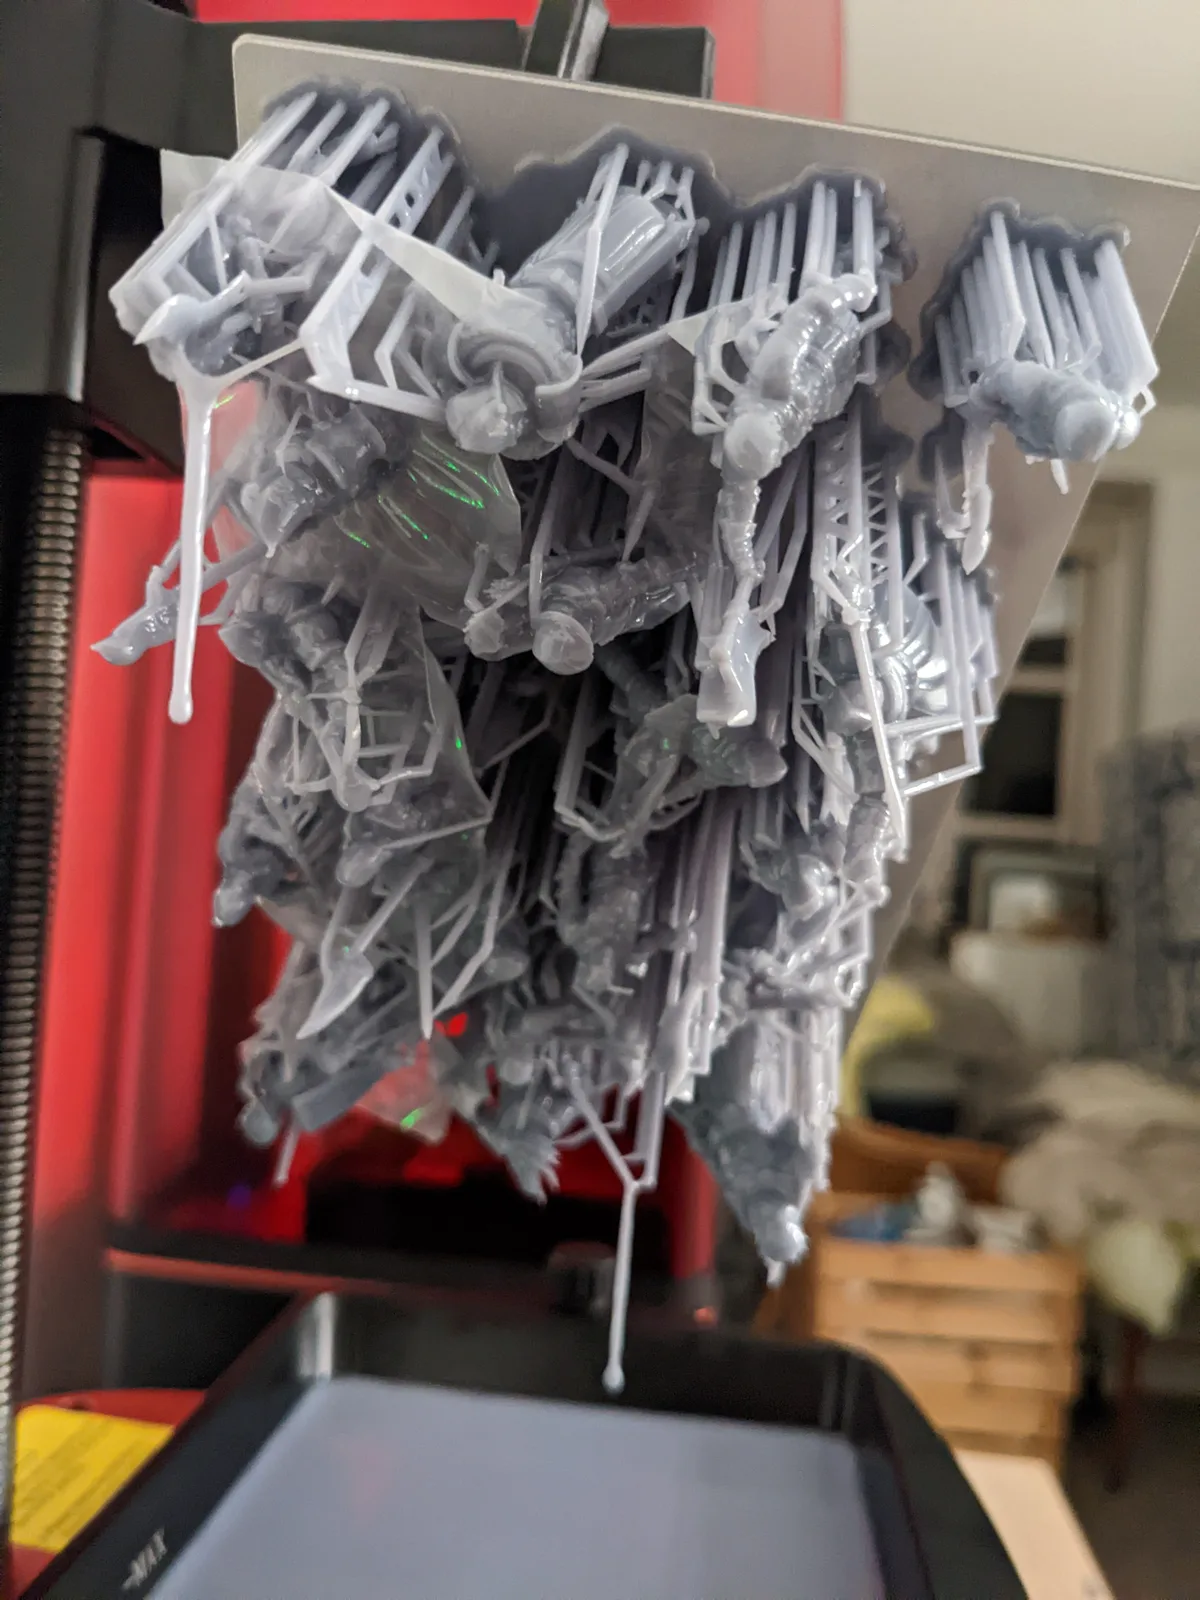
Resin print time is dominated by layer count and lift cycles, not resin volume. Eight models on a plate take roughly the same time as one model at the same height, because the screen exposes all of them simultaneously on every layer. Batching is therefore close to free. Not batching is expensive in the most avoidable way possible: the printer is running either way, and an underfilled plate is pure wasted time.
The printer does not care how many models are on the plate. It cures whatever is in front of the light source, layer by layer, until it runs out of layers. Add more models and the print time stays roughly the same. Leave the plate half empty and you have paid the full overnight print cost for half the output.
The two batching constraints
Two limits define how many models fit on a plate. Both matter, and they work differently.
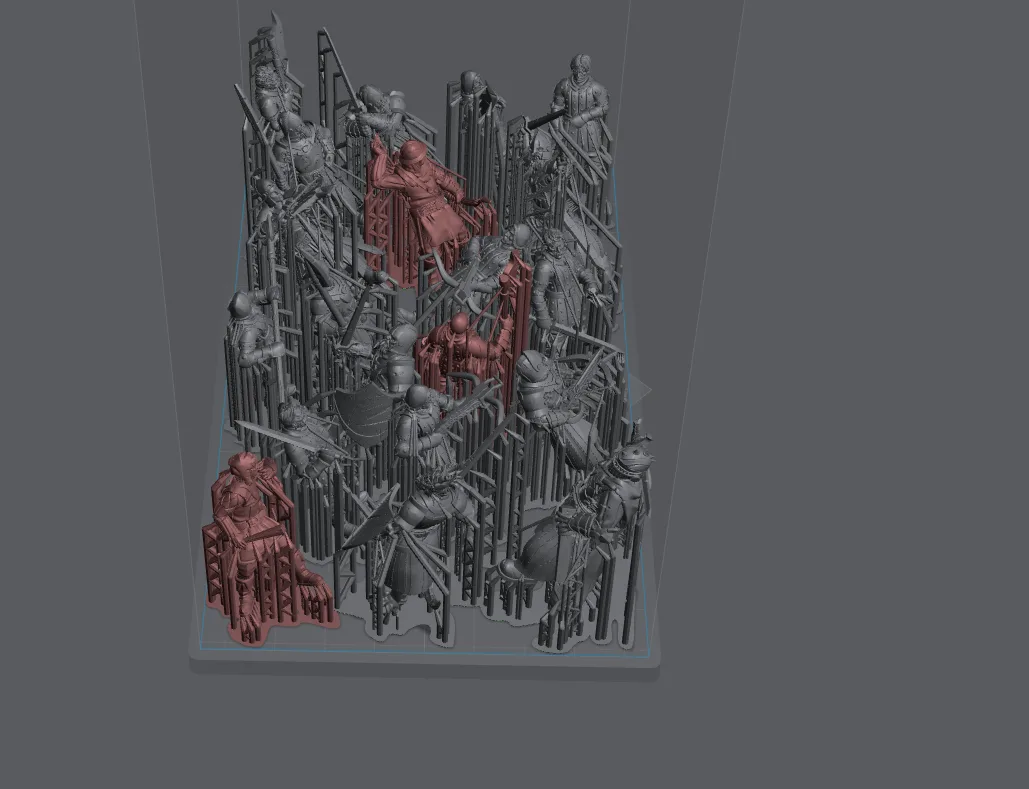
The first constraint is plate area: the projected footprint of every model, including its supports, must fit within the screen boundaries without overlapping. This is the obvious limit and the one painters think about first. The footprint of a tilted, pre-supported miniature is larger than the miniature itself because the support structure fans out below it.
The second constraint is plate height: the tallest model on the plate dictates the total layer count for the entire print. Every model on the plate is finished printing when the tallest model finishes. A short infantry figure next to a tall hero model means the infantry model is long since complete while the printer keeps running for the hero. The efficient answer is to group models by height, not just by footprint.
Pack the footprint first. Then check the lift height of every model in the group. If one model is significantly taller than the rest, pull it and print it separately or alongside other tall models.
Pre-supported file packing
Most paid miniature creators ship pre-supported files at a default tilted orientation. The supports are already placed, sized for the geometry, and tested on actual hardware. When you drag these files onto the plate, leave the orientation exactly as the creator set it. The supports came pre-added for a reason. Do not strip them to pack more tightly, and do not re-orient the model without also re-supporting it.
The practical implication is that you are packing objects, not models. The support structure is part of the object, and the object has a footprint that includes the support base. That footprint is what you are fitting onto the plate.
For pre-supported files, packing means dragging models onto the plate one at a time and checking that the support bases do not overlap. Leave a few millimetres between adjacent support bases. That gap is not wasted space; it is the clearance that prevents adjacent supports from fusing into a single unit and tearing off together.
The packing rule of thumb
A pre-supported 28 mm Astartes-style infantry model occupies roughly a 35 by 35 mm footprint with its supports included. That is an approximate figure because support structures vary between creators and slicer settings, but it is a useful planning number.
A Saturn-class plate is 219 by 123 mm. Dividing that out naively gives roughly 18 possible positions, but real packing is not perfectly efficient. Supports are not rectangular, models are not identical, and the plate edges are less reliable than the centre. A realistic tight layout on a Saturn plate holds roughly twelve to sixteen pre-supported 28 mm infantry models.
A Mars-class plate is 153 by 77 mm. The same calculation gives roughly six to eight models in a tight layout.
These are rough numbers, not targets. A plate with ten models packed well is a better print than a plate with fourteen models packed carelessly.
What to avoid
There are three packing mistakes that reliably waste prints.
The first is stacking models vertically, one on top of another. This compounds their heights and adds every layer of the upper model on top of the lower one. The whole point of batching is that models share layers; stacking destroys that and produces a print that takes as long as both models printed separately would take.
The second is tight clusters where adjacent support bases touch or overlap. Supports that fuse together during printing tear off as a single rigid unit. When that unit releases from the FEP at the wrong moment, it takes both models with it. Five millimetres of clearance between support bases is not much to ask and it prevents this failure mode entirely.
The third is placing models too close to the plate edge. The UV light source is least uniform at the edges. Exposure variability at the margins leads to under-exposed or over-exposed areas on models placed there, particularly when the resin and exposure settings have been calibrated against the plate centre. Move the edge models inward by a few millimetres and the uniformity improves.
Mixing model sizes on the same plate
Putting a tall hero model on a plate of short infantry is one of the most common batching inefficiencies, and it is easy to understand why it happens. The painter has three infantry models and one hero ready to print, and it seems logical to put them all on the same plate at once.
The problem is that the hero’s height extends the print run for the entire plate. The infantry finished their last layer hours before the hero did. Those hours of additional print time produced no additional infantry; they produced one hero model, which could have been printed at the same cost on its own plate.
The better practice is to batch models by height. Infantry with infantry. Heroes with heroes or other models of similar height. If a second printer is available, infantry and heroes can run in parallel and both plates finish in roughly the same overnight window. If only one printer is available, print the infantry plate first, then the hero plate on a different night.
This is not a hard rule. A hero that is only marginally taller than the infantry on the plate is not worth separating. The question is whether the height difference adds a meaningful number of additional layers. If the answer is more than an hour of print time, separate the plates.
Density versus failure rate
There is a ceiling on how tightly a plate should be packed, and it is not just the physical footprint limit. Higher density means more potential failure modes on the same plate.
A plate with twelve models and three failures produces nine usable models. A plate with four models and three failures produces one usable model. The same failure rate yields very different outcomes depending on how many models were on the plate to begin with.
This is an argument for filling the plate rather than leaving it sparse, because a dense plate insulates the output against individual failures. But it is also an argument for not pushing density past the point where failures become correlated. Adjacent models that share failure modes, such as models packed so tightly that a single support failure cascades into the neighbouring model, raise the failure rate faster than the density increases throughput.
For most painters working with pre-supported files and calibrated settings, a tight layout with approximately five millimetres between support bases is the reliable sweet spot. Tighter than that and the failure rate starts climbing. Looser than that and the output per plate drops without a compensating improvement in success rate.
The slicer auto-arrange button
Most slicers have an auto-arrange or auto-pack function that places models on the plate automatically. It is useful as a starting point and unreliable as a finishing point.
Auto-arrange is reasonably good at fitting models within the plate boundary and avoiding obvious overlaps. It is poor at avoiding plate-edge placements, where light uniformity is weakest. It does not know that the four models it placed in the corners are the ones most likely to fail. It also does not account for height grouping, so it will cheerfully place a tall hero next to a row of infantry without flagging the print-time cost.
The practical workflow is to run auto-arrange, then spend five minutes reviewing the result. Move any model that landed within ten millimetres of the plate edge inward. Check the tallest model against the rest of the plate and decide whether it belongs in this batch. Then slice.
Plate position and light uniformity
A miniature centred on the plate prints at the screen’s most uniform region. The UV light source in a resin printer is a flat LCD panel, and the light output is not perfectly even across the entire surface. The centre of the panel is typically the most uniform area; the corners and edges receive marginally less consistent exposure.
For rank-and-file infantry with simple surfaces, this variation is not visible in the finished model. For hero models with fine detail, it can produce subtle differences in surface quality depending on where the model sits on the plate. If a fine hero model is printing alongside infantry, place the hero in the centre of the plate and fill the edges with infantry.
The order of preference when filling a plate: centre first, then middle zones, then edges last. Edge positions are for the models where small exposure variations matter least.
The big model exception
A single dragon, vehicle, or large terrain piece occupies most or all of the plate by itself. The batching question does not apply in the same way. For these prints, the priority is orientation: find the orientation that minimises the lift height, because lift height is the entire cost of the print. A dragon printed with the body horizontal takes twice as many layers as the same dragon printed at the angle that minimises height.
Once the orientation is set, check whether any small models fit alongside the large one without overlapping its support structure or contributing significantly to the lift height. A couple of infantry bases tucked into the empty corners of the plate cost nothing and produce usable models from an otherwise single-model print run.
For large models specifically, the details on positioning, drainage, and settings adjustments are covered in Printing Bigger and Hollow Resin Miniatures.
Closing
The painters who get the most out of resin printing plan their print queue a few days ahead rather than one print at a time. Knowing what models are coming up means grouping them by height and footprint before the session starts. Keep a short queue of models at the same scale waiting in the slicer project. When a plate finishes and goes to the wash station, the next plate is already laid out. The twenty minutes of slicer time that felt like overhead becomes a once-per-session task rather than a per-plate delay.
Fill the plate and the printer earns its overnight run. Leave it half empty and the printer earns half as much for the same electricity and the same hours. The geometry is simple; the habit is the hard part.
For the full workflow from first print to finished model, Resin 3D Printing for Miniatures covers the end-to-end process. Orientation and packing are linked decisions; the full orientation discussion is in Resin Print Orientation Guide for Miniatures. The support settings article covers what to look for when pre-supported files run out. The CRISP method ties calibration, batching, and quality into a repeatable system.

