Some links on this page are affiliate links — marked with aff — and if you buy through them I may earn a small commission at no extra cost to you. Read the full disclosure.
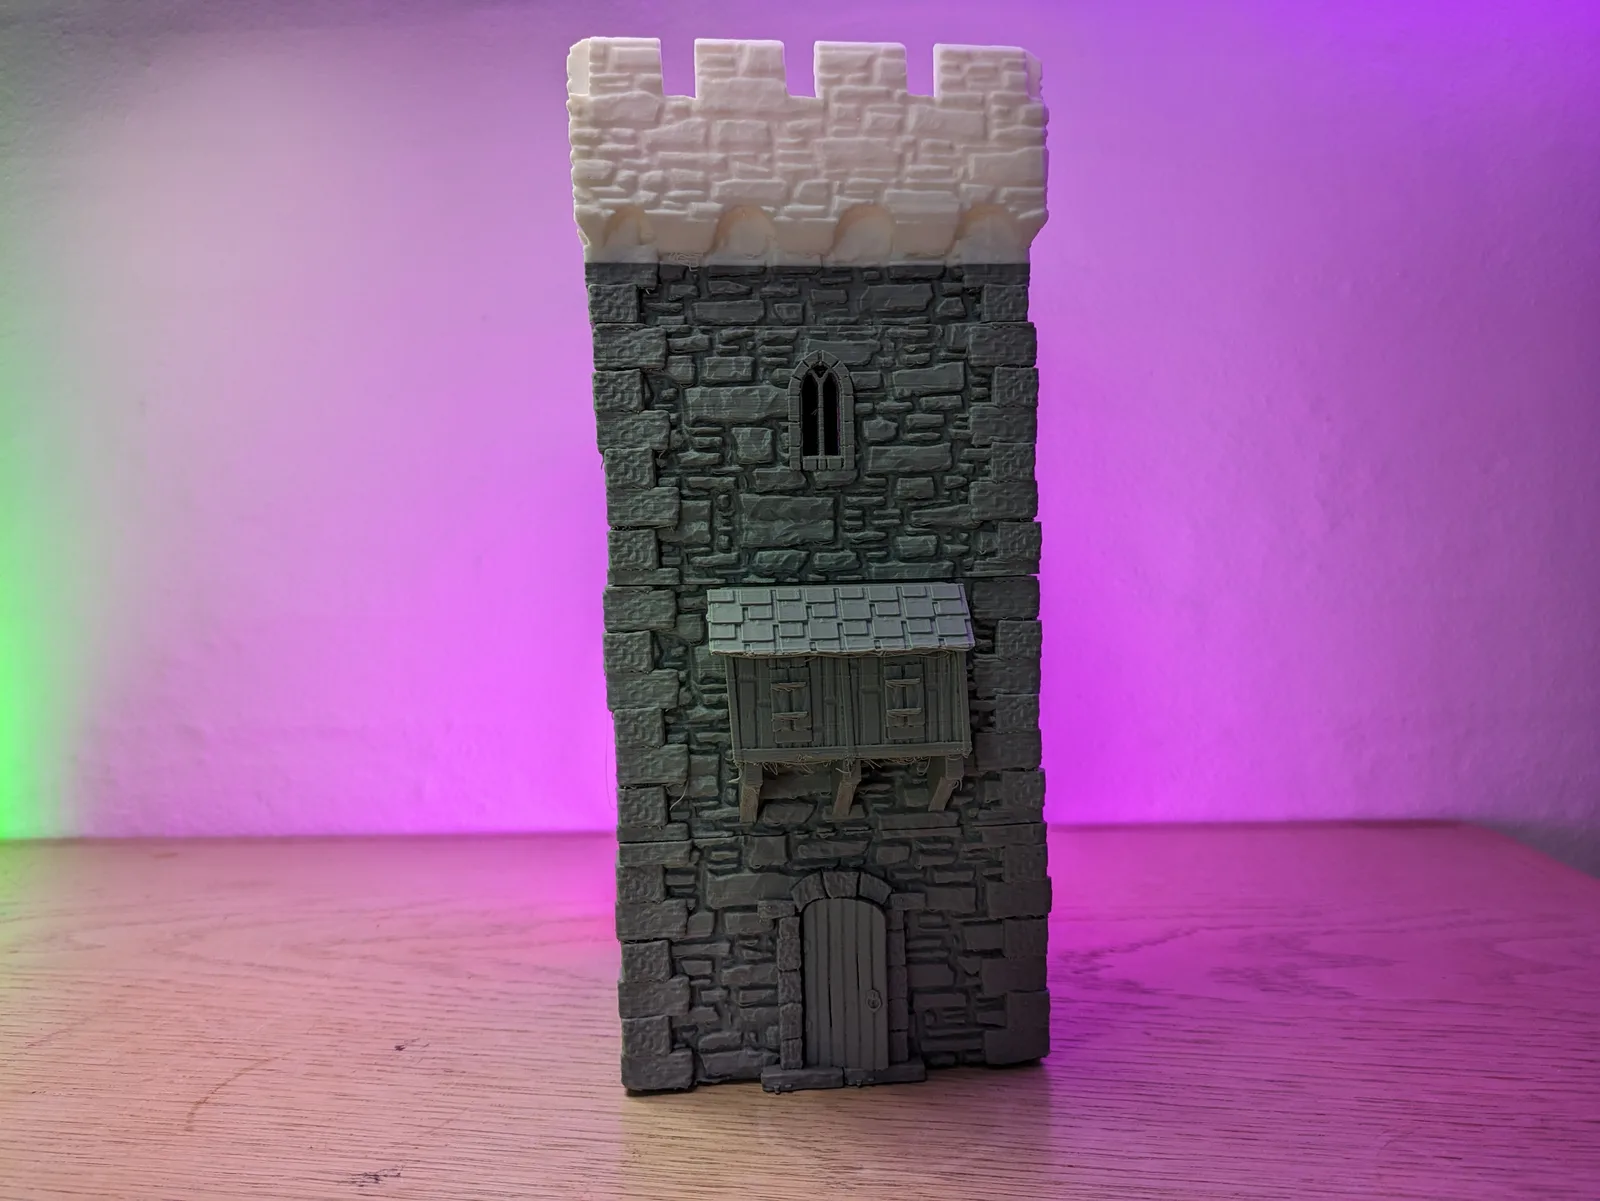
The renders of multicolour terrain printed on a Bambu A1 or Bambu P1S with an AMS are genuinely compelling. Stone grey cobblestones with dark mortar lines and rust-brown iron fittings, all printed in a single pass, no paintbrush involved. The visual is real. The workflow that produces it is also real. What is less visible in those renders is the purge tower sitting out of frame.
What follows covers when AMS terrain earns its investment and when it does not. The cases where multicolour printing replaces hours of painting, and the cases where paint still wins decisively at lower cost and better visual quality.
For first-hand observations on what AMS printing actually produces for tabletop pieces, including filament waste from real prints and practical verdict on the workflow, the Bambu AMS 2 Pro review for miniatures and terrain has the direct experience. That review covers the hands-on detail; the sections below extend the framing to terrain-specific decisions.
What the AMS does
The AMS (Automatic Material System) feeds filament from a multi-spool unit to the printer. When a layer requires a different colour, the AMS feeds back the outgoing filament, advances the new colour, purges the hot end, and continues printing. You do not touch anything between colour changes.
Bambu’s current AMS 2 Pro holds four spools and adds active drying via a heated chamber, which is useful for filaments that have absorbed moisture from the air. The original AMS holds four spools without the drying function. Both are compatible with the P1P, P1S, A1, and X-series printers; confirm the current compatibility list on Bambu’s product page before purchasing, as firmware updates can affect this.
Multiple AMS units can be chained together for larger palettes, though for terrain this is rarely worth the cost and complexity.
The AMS handles colour changes automatically based on the slicer’s colour assignments. In Bambu Studio, you use the “by-object” colour painting tool to assign filament colours to faces, regions, or layer bands. The slicer calculates the swap schedule and builds it into the print file.
The purge problem
Every colour swap produces purge waste. The hot end must flush every trace of the outgoing colour before the incoming colour prints cleanly. This is not a setting you can eliminate; it is a physical requirement of the process.
The purge volume scales with how different the two colours are. A dark grey to medium grey swap purges a small amount because the colours are close in tone and minor contamination is invisible. A white to black swap purges a large amount because any white contamination in a dark layer is visible as a streak. Bambu Studio lets you tune the flush volume per colour-pair transition; the defaults are conservative, meaning more waste but less contamination. Tightening the flush volume saves filament and risks ghost colour in your prints.
On a print with frequent colour swaps in every layer, the purge waste can represent a substantial fraction of the total filament consumed. A terrain piece with broad colour zones and infrequent swaps (stone grey floor with occasional dark mortar lines baked into every fifth layer) will have a much lower purge overhead than a piece with a complex colour pattern that changes on every layer.
The Bambu AMS 2 Pro review has markers noting the specific purge weights from real terrain prints. Rather than inventing numbers here, refer to that article for first-hand figures. The directional point is accurate: on a complex four-colour print, the purge tower is a significant fraction of total material. This is a real cost, not a footnote.
The use cases where AMS wins decisively
High-volume identical scatter pieces. This is the strongest case for AMS terrain. If you are printing 30 barrel pieces, all with the same brown-and-grey-and-rust colour scheme, the AMS prints them coloured and ready without any paintwork. Thirty pre-coloured barrels coming off the plate in a single session is a genuine time saving. And the colours are structurally through the plastic, not applied on the surface, which means gaming-table chips expose the correct colour underneath rather than grey or white PLA.
Modular tile sets where every piece has the same simple colour pattern. A dungeon floor set where all floor tiles are stone grey with dark grey mortar lines: the AMS prints the whole set coloured in one batch. The alternative is priming and drybrushing the same colour pattern across 30 tiles individually. For this use case, the AMS arguably earns its premium.
Display pieces for hobbyists who do not paint. If painting is not part of your workflow at all, the AMS is how you get colour into your terrain without it. A display centrepiece printed in three earth tones reads convincingly without any brushwork if the colour design is deliberate.
The use cases where paint wins decisively
Hero pieces with fine detail. AMS colour resolution is one full layer height. Sharp colour transitions on curved or detailed surfaces show the layer lines more than a single-colour print does. On a 28 mm character base, a detailed dungeon altar, or a centrepiece fountain, freehand painting can produce highlights, washes, and blended transitions that AMS printing cannot replicate. For pieces where the visual quality matters at close range, the brush wins.
Pieces with complex tonal variation. AMS produces flat zones of single colours. It does not produce gradients, blended edges, or the tonal variation that a drybrush and wash achieves by physically moving paint into recessed areas. Weathered stone, chipped metal, and organic textures all benefit from a paint workflow that interacts with the surface texture in ways colour zoning does not.
Pieces that will be painted anyway. If every terrain piece in your set gets primed and painted regardless, the AMS adds filament cost and print complexity without visible return. The paint covers the pre-print colour entirely.
The painted-versus-AMS break-even
The break-even question has two variables: your painting speed and the purge overhead on the specific piece.
A rough frame: if a piece takes under 15 minutes to paint to table standard (primer, single drybrush, done), painting is almost certainly cheaper in total cost than AMS printing that piece. If a piece takes an hour of painting and would also take only two colour swaps to AMS print, the AMS case starts to look better.
For most hobbyists, the break-even lands at:
- AMS-preferred: high-volume identical scatter, terrain sets where every piece has the same simple pattern, non-painting hobbyists.
- Paint-preferred: hero pieces, anything with more than four colour transitions per print, anything that will be painted regardless.
This calculation also includes the AMS hardware cost and the ongoing purge filament cost. Over a year of use, those add to the total. Whether they add enough to tip the calculation depends on how much scatter terrain you produce.
Settings that reduce purge waste
If you are running AMS terrain, a few slicer choices help manage the purge overhead.
Order colours from light to dark in the AMS slots. The slicer can then schedule swaps in a direction that requires less purge per transition. Dark contamination in a lighter colour is more visible than light contamination in a darker colour, so transitioning light-to-dark is less costly than dark-to-light.
Group same-colour layers. Where the design permits, batch the colour zones so swaps happen infrequently. A floor tile where the base colour runs for the bottom 60% of the print, with mortar lines only in the last 40%, requires far fewer swaps than one where the colours alternate every few layers.
Use Bambu Studio’s by-object tool for multi-piece plates. Printing identical scatter pieces 12 at a time means one purge per colour change covers the whole plate, not one purge per piece. The per-piece overhead drops significantly when batch-printing.
Tighten flush volumes on known safe pairs. For dark-to-dark transitions where contamination would be invisible (dark brown to dark grey, grey to dark stone), reduce the flush volume below the default. Bambu Studio lets you set this per colour-pair transition. Start conservatively and test before committing to a full-plate run.
The colour palette that prints well
Earth tones are the most reliable colour palette for terrain AMS printing. Greys, browns, sand tones, and dark earth colours all share a relatively narrow tonal range, which means the purge transitions between them are short and contamination from one into another is largely invisible.
The problem colours are the bright extremes. White and yellow require heavy purging before any darker colour because even minor contamination from a dark previous layer is visible as streaks. Black requires purging before any lighter colour for the same reason. The worst case is a white-to-black or black-to-white transition: this requires the largest flush volume of any pair and should be avoided adjacent in the printing order where possible.
For terrain specifically, a palette of three to four earth tones (stone grey, sand, dark mortar, rust brown) prints cleanly with low per-transition overhead. This palette also produces the most visually convincing terrain at table distance, independently of the purge efficiency.
Multi-AMS setups
Some hobbyists run two AMS units for eight-colour printing. For tabletop terrain, this is almost never worth it. The marginal visual benefit of colours five through eight is small, the purge multiplier compounds significantly with more colour pairs in play, and four earth tones produce better terrain than eight colours used poorly.
The one case where a second AMS makes sense for terrain is if your primary use is multi-pattern modular sets where the different tile types genuinely need different palettes. Even then, the simpler approach is to run two separate single-AMS print jobs with different colour schemes rather than one eight-colour job with a complex purge schedule.
Filament drying on the AMS 2 Pro
The AMS 2 Pro’s active drying is a quality-of-life feature rather than a terrain-specific advantage. It heats the spool chamber to dry moisture-affected filament as it feeds. This is genuinely useful for PETG and PLA-CF that have been sitting on an open shelf, where moisture absorption degrades print quality with popping, surface bubbling, and weakened layer adhesion.
For PLA terrain printed from a well-sealed filament storage setup, the drying feature is mostly inactive. It becomes useful in humid environments, in situations where filament has been left out for extended periods, or when running a mixed PETG-and-PLA project. It is not a reason by itself to choose the AMS 2 Pro over the original AMS unless those materials are a regular part of your workflow.
For a broader look at the slicer settings that pair best with AMS terrain, the FDM slicer settings guide for tabletop terrain covers wall count, layer height, and infill choices that work well with multicolour prints. For the question of whether the AMS is worth adding to a printer purchase at all, rather than how to use one you already have, that framing is covered more directly in a separate article in this cluster. And for the choice of printer that makes the most of an AMS workflow, the Bambu P1P review for tabletop covers the base machine experience.
AMS terrain is real for high-volume identical pieces and for hobbyists who want colour without painting. For hero pieces, for complex tonal variation, and for any set that will be painted regardless, the brush still wins. The most useful frame is not “AMS or paint” but “AMS for scatter, paint for heroes.” Both can exist in the same terrain project, and the combination produces better results than either approach alone.

