A 200 mm battle tank, a 180 mm boss monster, a 150 mm centrepiece building: these models print in resin at the cost of roughly half a bottle of resin, most of a day on the printer, and a non-trivial chance of a partial failure somewhere in the 14-hour window. They also push hard against the build volume of a Mars-class printer and produce significant support overhead.
Splitting them solves most of those problems at once. The detail-rich top half prints in resin at a manageable 90 mm scale. The structural base prints in PLA on an FDM machine, overnight, for a few cents of filament. The join is invisible under primer and paint. Total cost drops to roughly half. Total print time drops to two overnight sessions rather than one very long one. The technique requires a small amount of slicer work and a clean assembly step, and both are straightforward once you know the method.
What splits well and what does not
Not every large model benefits from this approach. The split works best on models with a natural horizontal break line: a place where the geometry transitions from one visual zone to another in a way that a seam would not be noticeable.
Good candidates for splitting:
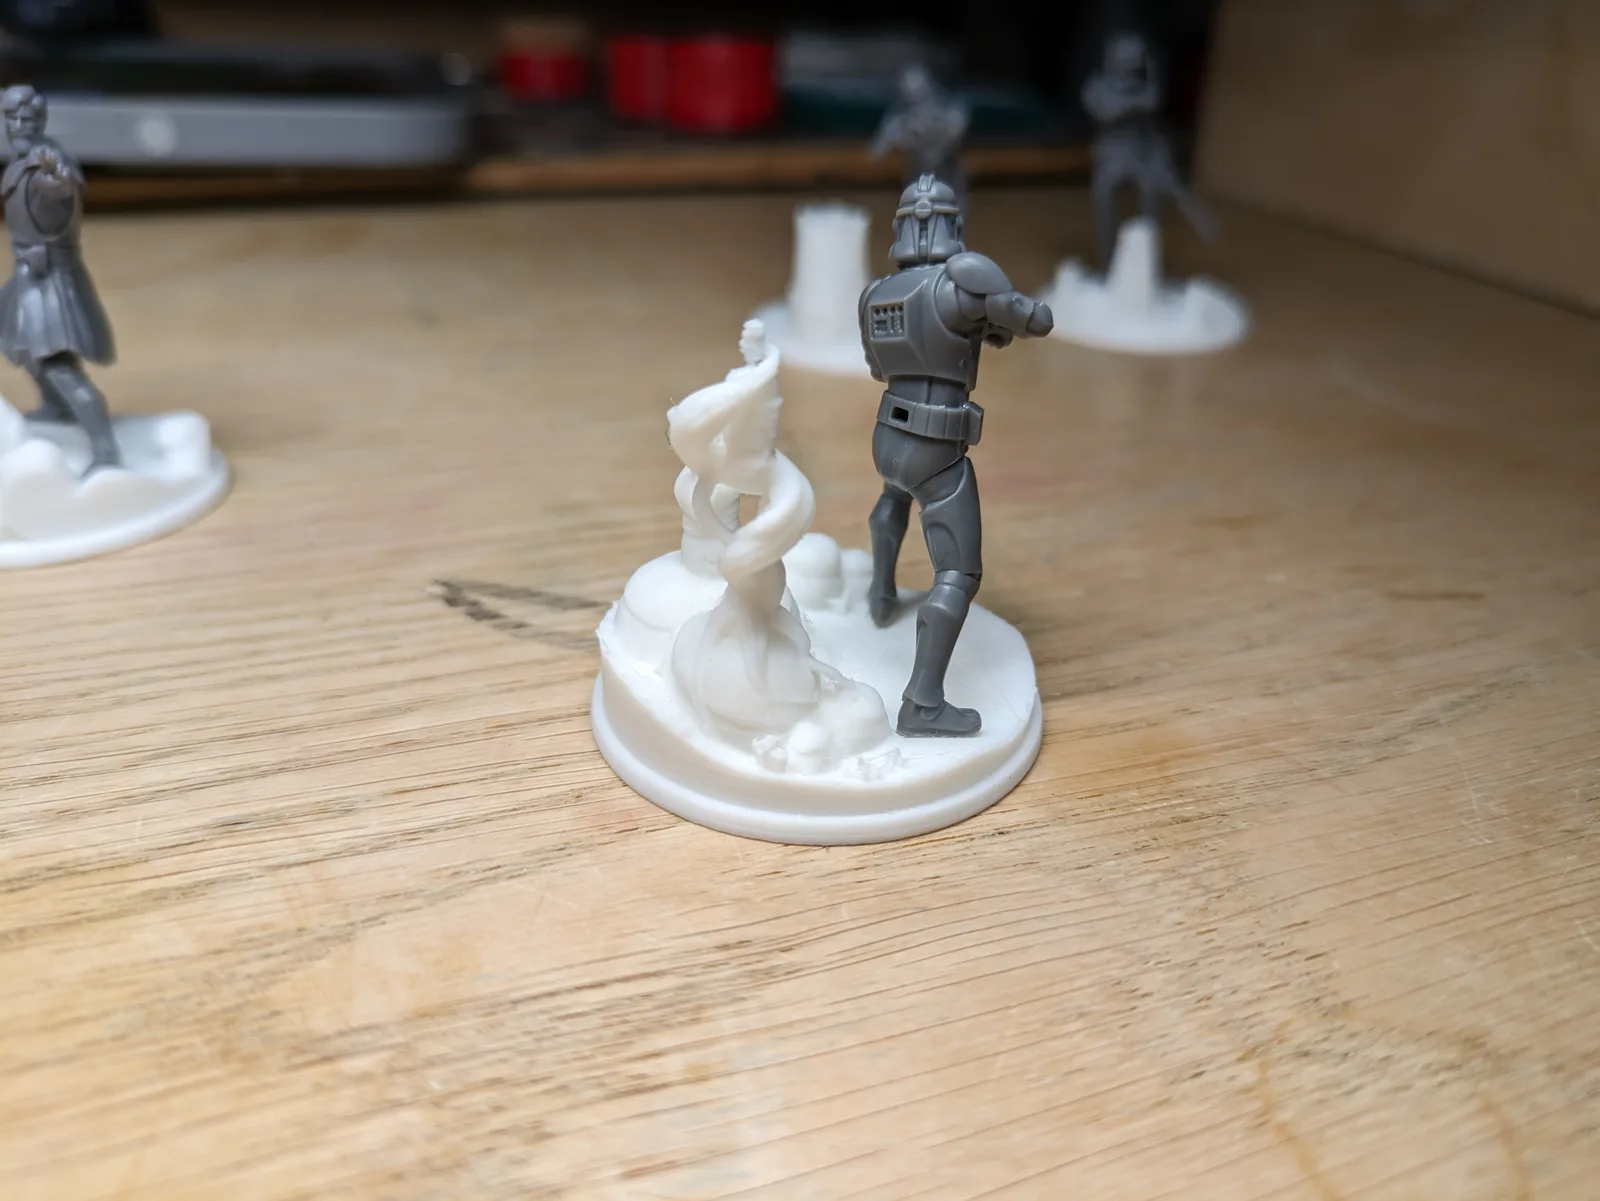
Vehicles. A tank chassis is a large block of structural geometry with no fine detail on the underside. The turret assembly carries all the visible detail. The natural split is at the hull-to-turret junction or, on models without a turret ring, at the point where the hull becomes visually dominant. The FDM half is the chassis, tracks, and lower hull. The resin half is the turret, hatches, antennae, and visible surface detail.
Large monsters and boss models. A large monster with a detailed torso, face, and weapon assembly often has a simpler base, legs, and lower body that carries less detail. The split runs through the waist or at the junction of a scenic base and the figure’s feet. The resin half carries the face and the weapon, which are the pieces the viewer reads. The FDM half is the base and the lower body.
Centrepiece terrain. A large tower with ornate battlements and carved detail at the top can split at the point where the architectural character changes: plain round shaft below, ornate upper section above. The FDM half is the shaft. The resin half is the upper section and the detail.
Poor candidates:
Hero miniatures. On a 28 mm to 54 mm hero figure, the visible surface area covers the entire model. There is no zone where a material transition would be hidden, and the detail case for resin applies to the whole piece. If the piece is small enough to print entirely in resin, print it entirely in resin.
Models without a clear break line. If the model is a continuous complex form with detail wrapping all the way around the lower half, finding a split plane that hides the seam requires significant geometry editing. The split is more work than the saving justifies for most models in this category.
Anything under roughly 80 mm. At this scale, resin handles the whole piece without the hollowing and support overhead penalties that make splitting worthwhile. When resin stops being worth it for bigger pieces covers the size threshold in detail.
Finding the split plane
The split plane is the horizontal slice that divides the model into two printable halves. Choosing it well is the most important step in the whole process.
Three rules govern a good split plane:
Avoid detailed areas. The seam runs where it will be hidden, not where it would be most convenient. A seam running through a face, a weapon, or a carved inscription is not a good seam. A seam running through a belt line, a tread groove, a terrain transition, or the underside of a cloak is.
Put the plane at a stable geometry. The join surface needs to be as large and flat as possible to give the adhesive area to work with. A split that runs through a narrow waist section creates a small gluing surface and a mechanically weak join. A split at a chassis line or a base-to-body junction creates a large flat surface that glues cleanly.
Split at or above the midpoint of total model height. If the goal is to have the resin half be the detail-carrying half, the split should put most of the detailed surface area on the resin side. Splitting at the bottom third of the model means the FDM half carries most of the visible surface, which defeats the purpose.
Slicer-side splitting
Once you have identified the split plane, the practical work happens in the slicers. Both Lychee Slicer (for the resin half) and Bambu Studio or OrcaSlicer (for the FDM half) include cut-plane tools that produce a clean horizontal slice at a specified Z height.
The key is to set the same Z value in both slicers relative to the model’s base, so the two halves meet cleanly on assembly. Measure or estimate the split height in millimetres, set the cut plane to that value in Lychee, export the top half as a separate STL, then open the original model in your FDM slicer and set the same cut height to produce the bottom half.
Before cutting, add a registration feature to the model at the split plane. A 2 to 4 mm cylindrical pin or peg extruded from the top of the FDM half and a matching socket on the bottom of the resin half keeps the two pieces aligned during gluing and prevents them from sliding out of register before the adhesive sets. Both Lychee and Bambu Studio have basic geometry primitives that let you add a simple pin without 3D modelling knowledge; alternatively, a small peg can be printed separately and glued to the FDM surface.
If the split plane runs through a feature that would leave a small unsupported overhang on either half, add a tiny bevel or fillet at the cut edge to clean the geometry. Most slicers handle this automatically, but it is worth checking before printing.
Printing each half
The resin half prints using your standard profile for the scale of the piece. Support as you would any resin print of the same dimensions. The critical detail is the joining surface: the flat base of the resin half where it meets the FDM piece. Confirm that this surface is fully supported and prints flat and clean, because it is what you will be gluing to. A joining surface with support stubs, warping, or resin residue will not glue cleanly. Deflash, sand lightly with 400-grit if needed, and confirm flatness before moving to assembly.
The FDM half has one specific requirement beyond the standard terrain print profile from the FDM slicer settings article: the top joining surface must print flat. Check that the infill pattern does not breach the top surface layer and leave voids or texture that would prevent flush contact with the resin half. Set the top surface layers to at least three layers (four is safer) to ensure the surface is fully solid and smooth. Run a brim on the FDM half for adhesion, especially if the footprint is smaller than the mass suggests.
Joining the two halves
Cyanoacrylate is the right adhesive for the join on most models. It bonds resin to PLA reliably, cures fast enough to hold the alignment through the initial set, and produces a join strong enough for regular gaming-table handling at display or terrain scale.
Apply a thin, even coat to the flat top surface of the FDM half. Do not flood the surface; the goal is coverage, not pooling. Insert the registration pin if you have one. Press the resin half firmly onto the FDM base, confirm alignment by eye, and hold for 30 to 60 seconds. Do not move the join for at least five minutes after the initial set. The full cure strength develops over an hour.
For very heavy resin pieces, or for pieces that will receive rough handling, add a brass pin for structural reinforcement. Drill a 1 to 1.5 mm hole through the resin half and into the FDM base, cut a length of brass rod to fit, dry-fit the assembly to confirm the alignment, then apply cyanoacrylate to the hole walls before pressing the pin in. A brass-reinforced cyanoacrylate join is effectively permanent under normal handling loads.
Two-part epoxy is an option for heavy display pieces that need the strongest possible bond. It is slower to apply and has a working time that requires holding alignment carefully, but it produces a high-strength join and fills small surface gaps better than cyanoacrylate. For practical gaming terrain, cyanoacrylate plus brass pin is the better choice.
Hiding the seam
The seam between the resin top and the FDM base is visible before primer. After primer and paint, it should not be.
The first step is to fill any small gap at the join with a thin bead of green stuff (two-part epoxy putty), Milliput, or a similar flexible gap-filler. Press it into the seam, smooth it with a wet finger or a silicone tool, and allow it to cure before sanding. Once cured, sand the filled seam flush with 400-grit sandpaper. The goal is not a perfect machined surface; it is a surface that reads as continuous under primer.
If the split plane was chosen well, the seam falls along a natural terrain or model transition: a tread groove, a belt line, an architectural ledge. These transitions already have geometric shadow lines that conceal small surface inconsistencies. A seam at a tread line painted with a wash looks like a clean panel gap. A seam at a smooth torso surface looks like a seam.
After filling and sanding, prime both halves together. One primer session over the assembled piece treats the join as part of the model, not as a repair. The wash step, applied consistently across the full model, pools into the filled seam and makes it read as shadow rather than repair.
Cost and time savings
The savings from splitting are real but not uniform across all models. The broad framing holds: resin volume on the top half is roughly half what it would be for the full model, which saves roughly half the resin cost and most of the support overhead on the detail-heavy portion. The FDM half costs a small amount of PLA filament and a few hours of print time.
For a 180 mm vehicle or centrepiece, the total cost at material level drops significantly compared with a full-resin print of the same model. The saving is larger on models where the lower half carries little detail, because the entire structural mass migrates to the cheaper technology. It is smaller on models where the lower half has surface detail that genuinely requires resin.
Print time also drops. A full 180 mm resin print is a long overnight session. Splitting produces a 90 mm resin print (shorter overnight) and a 90 mm FDM print (also a shorter overnight). Two smaller sessions are less risky than one long one: the failure window is shorter, the wasted material on a failure is lower, and the per-session post-processing load is lower.
Use cases that benefit most
The split approach produces the largest saving on models with these characteristics:
Models where the top half carries at least 70% of the visible detail. Vehicles with plain undersides. Monsters with simple leg geometry. Centrepiece towers with plain shafts. The more of the model’s visual interest is concentrated in the top half, the greater the argument for making only the top half in resin.
Models where the total height pushes against the build volume of a Mars-class printer. At 150 mm and above, the practical argument for splitting is strong. The approach is also relevant for models in the 100 to 150 mm range that would require hollow printing in resin, where the hollowing complexity can be avoided entirely by printing the lower section in FDM instead.
Long-form projects where multiple large pieces are needed. A campaign-level centrepiece collection with four or five large models benefits significantly from the split approach because the material and time savings compound across the set.
Closing
Splitting big models is the practical workaround for resin’s size ceiling. Cheaper, faster, and invisible under paint, it is a technique that rewards the effort of setting it up well once. The split plane is the most important decision in the whole process, and the payoff for choosing it thoughtfully is a join that disappears entirely under primer. For the full context on where the resin size threshold sits and when FDM becomes the default choice, see when resin stops being worth it for bigger pieces. For planning a full hybrid set that uses both technologies from the start, hybrid terrain sets: resin and FDM together covers the planning, scale matching, and painting workflow for a unified result. The resin or FDM for tabletop terrain framework underpins all of it.

